Free Preparation Discussions
Microsoft AZ-400 Exam Questions
- Topic 1: Design and implement processes and communications: The topic includes the design and implementation of traceability and the flow of work, along with establishing appropriate metrics and queries for DevOps. It also involves configuring collaboration and communication strategies to ensure smooth operations.
- Topic 2: Design and implement a source control strategy: Under this topic, the focus is on creating effective branching strategies for source code. Additionally, configuring and managing repositories is an essential component to support version control and code integrity.
- Topic 3: Design and implement build and release pipelines: The topic covers designing a package management strategy, as well as developing a testing strategy for pipelines. It also includes implementing pipelines and deployments, utilizing infrastructure as code (IaC), and maintaining these pipelines.
- Topic 4: Develop a security and compliance plan: The topic involves designing and implementing authentication and authorization methods. It also covers strategies for managing sensitive information in automation and automating security and compliance scanning processes.
- Topic 5: Implement an instrumentation strategy: In this topic, the key areas include configuring monitoring for a DevOps environment. Additionally, it focuses on analyzing metrics derived from instrumentation to optimize system performance and reliability.
Free Microsoft AZ-400 Exam Actual Questions
Note: Premium Questions for AZ-400 were last updated On Mar. 04, 2026 (see below)
Your company hosts a web application in Azure. The company uses Azure Pipelines for the build and release management of the application.
Stakeholders report that the past few releases have negatively affected system performance.
You configure alerts in Azure Monitor.
You need to ensure that new releases are only deployed to production if the releases meet defined performance baseline criteria in the staging environment first
What should you use to prevent the deployment of releases that fail to meet the performance baseline?
https://docs.microsoft.com/en-us/azure/azure-monitor/continuous-monitoring
https://docs.microsoft.com/en-us/azure/devops/pipelines/release/approvals/gates?view=azure-devops
You plan to use a NuGet package in a project in Azure DevOps. The NuGet package is in a feed that requires authentication.
You needto ensure that the project can restore the NuGet package automatically.
What should the project use to automate the authentication?
The Azure Artifacts Credential Provider automates the acquisition of credentials needed torestore NuGet
packages as part of your .NET development workflow. It integrates with MSBuild, dotnet, and NuGet(.exe) and works on Windows, Mac, and Linux. Any time you want to use packages from an Azure Artifacts feed, the Credential Provider will automatically acquire and securely store a token on behalf of the NuGet client you're using.
https://github.com/Microsoft/artifacts-credprovider
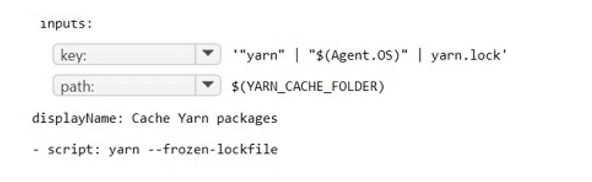
SIMULATION
You have an Azure subscription that containsAzure DevOps build pipelines.
You to implement pipeline caching by using the cache task
HOW should you complete the YAML definition? TO answer, select the appropriate options in the answer area.
Answer is as below.
Note: This question is part of a series of questions that present the same scenario. Each question in the series contains a unique solution that might meet the stated goals. Some question sets might have more than one correct solution, while others might not have a correct solution
After you answer a question in this section, you will NOT be able to return to it. As a result, these questions will not appear in the review screen
Your company has a project in Azure DevOps for a new web application.
You need to ensure that when code is checked in, a build runs automatically.
Solution: From the Continuous deployment trigger settings of the release pipeline, you enable thePull request triggersetting.
Does the meet the goal?
In Visual Designer you enable continuous integration (CI) by:
Select the Triggers tab.
Enable Continuous integration.
https://docs.microsoft.com/en-us/azure/devops/pipelines/get-started-designer
SIMULATION
You need to create and configure an Azure Storage account named az400lod11566895stor in a resource group named RG1lod11566895 to store the boot diagnostics for a virtual machine named VM1.
To complete this task, sign in to the Microsoft Azure portal.
Step 1: To create a general-purpose v2 storage account in the Azure portal, follow these steps:
On the Azure portal menu, select All services. In the list of resources,type Storage Accounts. As you begin typing, the list filters based on your input. Select Storage Accounts.
On the Storage Accounts window that appears, choose Add.
Select the subscription in which to create the storage account.
Under the Resource group field, select RG1lod11566895
Next, enter a name for your storage account named: az400lod11566895stor
Select Create.
Step 2: Enable boot diagnostics on existing virtual machine
To enable Boot diagnostics on an existing virtual machine, follow these steps:
1.Sign in to the Azure portal, and then select the virtual machine VM1.
2. In the Support + troubleshooting section, select Boot diagnostics, then select the Settings tab.
3. In Boot diagnostics settings, change the status to On, and from the Storage account drop-down list, select the storage account az400lod11566895stor.
4. Save the change.
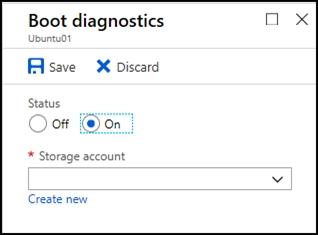
You must restart the virtual machine for the change to take effect.
https://docs.microsoft.com/en-us/azure/storage/common/storage-account-create
https://docs.microsoft.com/en-us/azure/virtual-machines/troubleshooting/boot-diagnostics
- Select Question Types you want
- Set your Desired Pass Percentage
- Allocate Time (Hours : Minutes)
- Create Multiple Practice tests with Limited Questions
- Customer Support
Audrie
5 days agoLeonor
16 days agoRosina
24 days agoAntione
1 month agoSerina
1 month agoLucille
2 months agoShaun
2 months agoHyun
2 months agoViola
2 months agoAnnett
3 months agoCecily
3 months agoBettyann
3 months agoJaclyn
3 months agoMaurine
4 months agoTabetha
4 months agoFelton
4 months agoLaquanda
4 months agoSherrell
5 months agoGerald
5 months agoCarry
5 months agoXenia
5 months agoPortia
6 months agoValda
6 months agoGalen
6 months agoVeronika
6 months agoSantos
6 months agoEmiko
8 months agoLenita
8 months agoFlorinda
8 months agoVincent
9 months agoTimothy
9 months agoHershel
10 months agoAntonio
11 months agoErick
11 months agoXuan
12 months agoDwight
12 months agoGarry
1 year agoIzetta
1 year agoEdison
1 year agoDino
1 year agoJamey
1 year agoVilma
1 year agoTwanna
1 year agoTawna
1 year agoWilliam
1 year agoRicki
1 year agoKattie
1 year agoGeoffrey
1 year agoDulce
1 year agoCherelle
1 year agoBillye
1 year agoAmber
1 year agoTula
1 year agoThea
1 year agoBrittani
1 year agoRoy
1 year agoEttie
1 year agoJannette
1 year agoLindsay
1 year agoBev
1 year agoGwenn
1 year agoGlendora
1 year agoVernell
2 years agoAlison
2 years agoMarguerita
2 years agoLacresha
2 years agoSalley
2 years agoJanae
2 years agoYoulanda
2 years agoAmber
2 years agoTyisha
2 years ago