Free Preparation Discussions
HPE7-A02 Exam Questions
- HP Aruba Certifications
- HP Aruba Certified Network Security Professional ACNSP Certifications
- Topic 1: Define Security Terminology: This section of the exam measures the skills of Security Analysts and covers essential security concepts and terms. It includes understanding key definitions and their applications in network security. A skill to be measured is the ability to define critical security terms accurately.
- Topic 2: Describe PKI Dependencies: This section assesses the skills of Network Security Engineers and focuses on Public Key Infrastructure (PKI) dependencies. It addresses how PKI supports secure communication and authentication processes in a network environment. A key skill measured is understanding the role of certificates in securing communications.
- Topic 3: Mitigate Threats Using CPDI: This section evaluates the skills of Network Administrators and emphasizes using ClearPass Device Insight (CPDI) to identify traffic flows and apply tags. It also covers using ClearPass Policy Manager (CPPM) to take actions based on those tags. A significant skill measured is the ability to implement traffic tagging effectively.
- Topic 4: Explain the Methods and Benefits of Profiling: This section measures the skills of Security Engineers and focuses on profiling methods for identifying devices on a network. It discusses various profiling techniques and their benefits for enhancing security posture. A key skill assessed is the ability to analyze device behavior for security insights.
- Topic 5: Explain How Aruba Solutions Apply to Different Security Vectors: This section targets Security Architects and covers how Aruba solutions address various security vectors. It highlights the integration of Aruba products into a comprehensive security framework. A skill measured here is understanding how different solutions work together to enhance network security.
- Topic 6: Explain Zero Trust Security with Aruba Solutions: This section assesses the skills of Cybersecurity Specialists and focuses on implementing Zero Trust Security principles using Aruba solutions. It discusses how these solutions enforce strict access controls based on user identity and device health. A critical skill measured is applying Zero Trust concepts in real-world scenarios.
- Topic 7: Explain WIPS and WIDS, Describe the Aruba 9x00 Series: This section evaluates the skills of Wireless Network Engineers and covers Wireless Intrusion Prevention Systems (WIPS) and Wireless Intrusion Detection Systems (WIDS). It also describes the features of the Aruba 9x00 Series access points. A key skill measured is understanding how WIPS/WIDS enhance wireless security.
- Topic 8: Describe Log Types and Levels: This section measures the skills of IT Auditors and focuses on different log types and levels within network systems. It includes using CPPM's ingress event engine to integrate with third-party logging solutions. A significant skill assessed is interpreting log data for security monitoring.
- Topic 9: Explain Dynamic Segmentation: This section targets Network Architects and covers dynamic segmentation, its benefits, and use cases in network design. It emphasizes how segmentation can enhance security by isolating different network segments. A key skill measured is implementing segmentation strategies effectively.
- Topic 10: Device Hardening: This section assesses the skills of Systems Administrators and focuses on securing network infrastructure through device hardening techniques. It includes advanced authentication methods like TACACS+ authorization and multi-factor authentication. A critical skill measured is applying hardening practices to secure devices.
- Topic 11: Secure WLAN: This section measures the skills of Wireless Security Specialists and emphasizes deploying AAA (Authentication, Authorization, Accounting) for WLANs using ClearPass Policy Manager (CPPM). It covers securing wireless networks against unauthorized access. A key skill assessed is configuring AAA protocols effectively.
- Topic 12: Secure Wired AOS-CX: This section evaluates the skills of Network Security Engineers focusing on deploying AAA for wired devices with CPPM. It includes configuring 802.1x authentication for access points. A significant skill measured is implementing AAA protocols for wired networks.
- Topic 13: Secure the WAN: This section targets WAN Engineers and covers automating VPN deployment for WAN using Aruba SD-Branch solutions. It discusses designing remote VPNs with VIA Endpoint classification. A key skill assessed is configuring secure VPN connections effectively.
- Topic 14: Threat Detection: This section measures the skills of Incident Response Analysts focusing on investigating alerts from Aruba Central and interpreting packet captures for threat detection. A critical skill measured is analyzing alerts to identify potential security incidents.
- Topic 15: Troubleshooting: This section evaluates the skills of Network Troubleshooters focusing on deploying Network Analytic Engine (NAE) scripts for monitoring network performance. It includes performing packet captures locally or via Aruba Central. A key skill assessed is troubleshooting network issues using analytics.
- Topic 16: Endpoint Classification: This section measures the skills of Endpoint Security Analysts focusing on analyzing endpoint classification data to identify risks within a network environment. It also covers analyzing data on CPDI for enhanced security insights. A significant skill measured is assessing endpoint risk levels accurately.
- Topic 17: Forensics: This section targets Forensic Analysts and explains CPDI capabilities for displaying network conversations on supported Aruba devices. It emphasizes how these capabilities aid in forensic investigations post-incident. A key skill assessed is utilizing CPDI for effective forensic analysis.
Free HP HPE7-A02 Exam Actual Questions
Note: Premium Questions for HPE7-A02 were last updated On Jul. 10, 2026 (see below)
A company wants to turn on Wireless IDS/IPS infrastructure and client detection at the high level on HPE Aruba Networking APs. The company does not want to
enable any prevention settings.
What should you explain about HPE Aruba Networking recommendations?
When enabling Wireless IDS/IPS infrastructure and client detection at a high level on HPE Aruba Networking APs without enabling prevention settings, HPE Aruba Networking recommends configuring detection at a custom level and adjusting settings to minimize false positives. This approach allows for effective monitoring while reducing the risk of unnecessary alerts and maintaining the accuracy of detections.
1.Custom Level Configuration: By customizing the detection settings, you can tailor the system to your specific environment, ensuring that only relevant threats are detected and reducing false positives.
2.False Positive Reduction: Disabling or tuning settings that are likely to produce false positives helps in maintaining the reliability of the detection system and prevents alert fatigue.
3.Focused Detection: Custom configuration ensures that the IDS/IPS focuses on critical detections, improving overall security posture.
You are configuring an HPE Aruba Networking VIA solution for a customer. The customer wants this behavior for remote clients that connect to the VPN:
They forward internet traffic locally.
They forward traffic destined to the data center over the VPN.
How can you configure this behavior?
The requirement describes split tunneling. Internet-bound traffic should remain local at the remote client, while traffic destined for corporate data center networks should traverse the VPN tunnel. In Aruba VIA, this behavior is configured in the VIA Connection Profile by enabling split tunneling and defining which destination networks should be tunneled. Adding the data center networks to the tunneled networks list ensures only those corporate routes are sent through the VPN. Firewall roles control access permissions after authentication, but they are not the primary place to define the VIA client's split-tunnel routing behavior. VPN pools assign client IP addresses, not destination routing rules. Therefore, split tunneling in the VIA Connection Profile is the correct configuration.
===============
A company is implementing HPE Aruba Networking Wireless IDS/IPS (WIDS/WIPS) on its AOS-10 APs, which are managed in HPE Aruba Networking Central.
What is one requirement for enabling detection of rogue APs?
To enable the detection of rogue APs with HPE Aruba Networking Wireless IDS/IPS (WIDS/WIPS) on AOS-10 APs managed in HPE Aruba Networking Central, each AP must have a Foundation with Security license. This license enables advanced security features, including rogue AP detection, which is crucial for maintaining a secure wireless environment and protecting against unauthorized access points.
A company has HPE Aruba Networking gateways that implement gateway IDS/IPS. Admins sometimes check the Security Dashboard, but they want a faster way to discover if a gateway starts detecting threats in traffic.
What should they do?
1. The Need for Faster Threat Notifications
Admins need immediate alerts when threats are detected by the gateway's IDS/IPS functionality. Regularly checking the Security Dashboard is inefficient, so an automated notification system is essential for faster response times.
2. Explanation of Each Option
A . Set up Webhooks that are attached to the HPE Aruba Networking Central Threat Dashboard:
Incorrect:
Webhooks are useful for integrating alerts with third-party tools or custom workflows. However, setting up email notifications through global alert settings is faster and simpler for this purpose.
B . Use Syslog to integrate the gateways with HPE Aruba Networking ClearPass Policy Manager (CPPM) event processing:
Incorrect:
Syslog integration with CPPM is typically used for logging and correlating events, not for real-time notifications about threats.
CPPM is better suited for policy enforcement, not instant threat alerts.
C . Set up email notifications using HPE Aruba Networking Central's global alert settings:
Correct:
HPE Aruba Networking Central has global alert settings that allow admins to configure email notifications for specific events, such as threat detection.
This is the simplest and most effective way to ensure admins receive immediate notifications when threats are detected by the gateways.
D . Integrate HPE Aruba Networking ClearPass Device Insight (CPDI) with Central and schedule hourly reports:
Incorrect:
While CPDI integration provides enhanced device profiling, it is not directly tied to gateway IDS/IPS threat detection.
Hourly reports are not real-time notifications and would not meet the requirement for faster threat alerts.
Final Recommendation
Setting up email notifications through HPE Aruba Networking Central's global alert settings provides the most direct and efficient solution for immediate threat detection alerts.
Reference
HPE Aruba Networking Central Alert Management Documentation.
Aruba IDS/IPS and Security Dashboard Configuration Guide.
Email Notification Setup for Aruba Central Threat Alerts.
Refer to the exhibit.
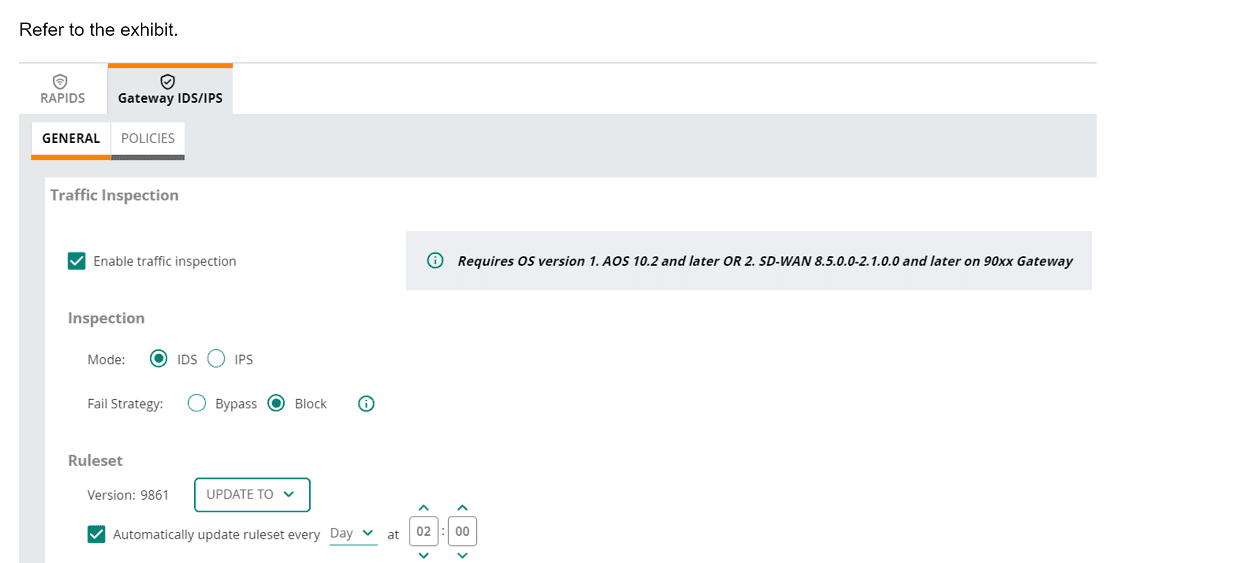
(Note that the HPE Aruba Networking Central interface shown here might look slightly different from what you see in your HPE Aruba Networking Central
interface as versions change; however, similar concepts continue to apply.)
An HPE Aruba Networking 9x00 gateway is part of an HPE Aruba Networking Central group that has the settings shown in the exhibit. What would cause the
gateway to drop traffic as part of its IDPS settings?
In the exhibit, the HPE Aruba Networking Central settings for the 9x00 gateway show that traffic inspection is enabled, and the gateway is set to operate in IDS (Intrusion Detection System) mode with the fail strategy set to 'Block'. This configuration means that the gateway will drop traffic if it matches a rule in the active ruleset.
1.Active Ruleset: The ruleset version 9861 is active, and the gateway is configured to automatically update the ruleset daily.
2.Traffic Matching Rules: When traffic matches a rule in the active ruleset, it is flagged as suspicious or malicious.
3.Block Mode: Since the fail strategy is set to 'Block', any traffic that matches a rule in the active ruleset will be dropped to prevent potential threats.
- Select Question Types you want
- Set your Desired Pass Percentage
- Allocate Time (Hours : Minutes)
- Create Multiple Practice tests with Limited Questions
- Customer Support
Rebecca Thompson
13 days agoCrystal Hall
29 days agoPaul Jones
1 month agoAnthony Allen
2 months agoDeborah Phillips
2 months agoTiffany Bailey
3 months agoOlivia Nguyen
2 months agoMargaret Flores
3 months agoGary Garcia
3 months agoStephen Rogers
3 months agoElizabeth Mitchell
2 months agoLemuel
3 months agoGary
4 months agoParis
4 months agoColette
4 months agoUlysses
4 months agoVannessa
5 months agoStephanie
5 months agoVallie
5 months agoCarri
5 months agoCiara
6 months agoDarci
6 months agoTarra
6 months agoKiley
6 months agoCorazon
7 months agoJanella
7 months agoJackie
7 months agoAmmie
7 months agoShawnna
8 months agoRueben
8 months agoDulce
8 months agoCorinne
8 months agoTrina
9 months agoCorrie
9 months agoAmie
9 months agoJohanna
9 months agoMelita
10 months agoElliot
10 months agoTimmy
10 months agoTonette
10 months agoTerrilyn
10 months agoJulian
10 months agoRoyal
10 months agoAlonso
1 year agoLaticia
1 year agoTiera
1 year agoStephen
1 year agoOcie
1 year agoLewis
1 year agoCharlene
1 year agoBenedict
1 year agoLavonda
1 year agoDelsie
1 year agoDenny
1 year agoJose
1 year agoHarrison
1 year agoErasmo
1 year agoElza
1 year agoErick
1 year agoZoila
1 year agoCatalina
1 year ago